Wednesday, December 26, 2012

Rava Laadu (Rava Laddoo, Suji ke ladoo, Sweet Semolina Balls)

100 followers & counting! :))))
Good reason to be all smiles..right!?

The best part when I go back home for vacations is I get to stay with my in-laws & my parents, more or less at the same time. They all live in the same city :)

Much before the Diwali holidays I had called my mother to tell her that I was craving for the lovely sweets like Karjikai (Gujia) & Rava Laadu (Rava Laddoo) that she prepares & so she suggested that I learn those this time over when I assist her.

Diwali was fun! Lots of preparations were done. Bought new clothes, lots of decorative, gifts, lights, some fire crackers, diyas, candles & many sweets.

That did not stop us from preparing sweets which is very interesting especially when done in groups.

So, Rava Laadu, Karjikai & Kai Murrkuu were made at home!

Rava Laadu is my all time favorite as it can be prepared instantly.

All you need is:

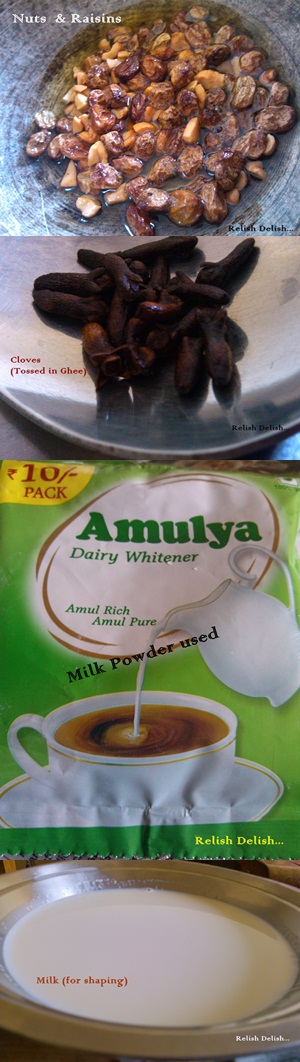
Rava/Semolina : 3 cups, Lightly roasted till light golden & powdered
Sugar - 3 cups, powdered
Cardamom powder - 1 tsp
Cloves - about 20, toasted in ghee for 20 secs
Dry fruits - Cashews, Raisins, Pistas, Almonds - break into smaller pieces & toast in ghee for 30 secs
Milk powder - One 50gms sachet
Milk - about half a cup or as much required for binding
Ghee - 4 tbsp

Method:
After you toast the rava till light golden or golden put it in a mixer to powder it. Keep aside.
Now, powder the sugar & put it over the semolina powder.
Add the cardamom powder, milk powder & the fried nuts along with all the ghee.
Mix together & just sprinkle milk as required. Do not pour the entire half cup of milk as it might not be required. Just keep sprinkling while mixing & add only if more is required. It will bind very well.
While you start shaping them into balls insert 1 clove into each laddoo.
You can keep some milk separately to use for binding while shaping the laddoo.
Adding milk softens the laddoo & keeps it soft for a longer time.


Note:
There are variants of this laddoo too
You may add coconut or add just the dry fruits you like
You may just add some clove powder instead of whole cloves
I chose to shape some laddoos without the cloves in them
Try to chew on the cloves & not discard them as they are very good for health


Thursday, October 25, 2012

Spiced Tomato Coconut Rice

Are we talking about quick cooking!? Yes, We are!

Being a south Indian all my friends ask me to cook lemon rice, curd rice, tamarind rice, coconut rice & tomato rice for them quite often. 

This time I had some time to click the pic so here comes my recipe for some 
Spiced Tomato Coconut Rice.

This serves as one of the tangy tasty filling dishes for dinner.

There are variations to this which I will keep posting. 


However, for this one all you need is:

  • 1 cup dessicated Coconut
  • 4 ripe medium tomatoes
  • 1.5 cups rice
  • 1 tsp Mustard seeds
  • 2 tsps  Roasted Peanuts
  • 1 tsp Urad dal/White lentil
  • 3 Green chillies
  • 1 tsp Turmeric Powder 
  • 4 ground pepper
  • 1 Bay leaf
  • Salt as per taste
  • Oil/Ghee - for cooking


Method:
Boil the rice & keep aside.
Now heat a pan & add some ghee. Throw in the mustard seeds & when they start to splutter add the urad dal. As soon as it gets golden add the green chilies & the tomatoes to it. Ensure that the tomatoes are cut very thin. It will quicken the cooking process & make it pasty very easily. Cover to cook.
The oil can be seen in the sides so it is now ready for the coconut in it. Saute & add turmeric powder, ground pepper & salt to this. Within a minute add the peanuts & the boiled rice to this & your Tomato Coconut rice is all set to be served with Garlic Rasam & Papad.

Note:
Turmeric Powder/Coconut & Peanuts are optional
You may add a dash of Ginger garlic paste if you wish
You may add curry leaves too - I didn't have fresh ones
You can carry this in your lunch box too
You cant keep this for long as coconut gets spoilt easily - not good for long journeys


Monday, October 15, 2012

Lauki Thepla (Spiced Indian Flat-bread)

Gujarati recipes are always liked by my folks at home. This time around I tried the Lauki theplas.
These theplas are not just tasty but also works very well to fill in your tummy. 

During my school days I have always gorged on the tiffin boxes my Gujarati friends would get & finish it off much before the snack breaks. I classify this as a perfect snack! Works fine for breakfast as well.

I dedicate this post to all my Gujju friends! :)

This is a HIT if you travel long distance by train as this spiced Indian flat-bread remains perfect for long hours. It does not require refrigeration however, if you want to store them at home you are free to refrigerate & re-heat as & when required.


You will need:
  • Lauki (Bottle Gourd) - 1 cup grated
  • Wheat flour - 3 cups
  • Green chillies - 3 finely shredded
  • Ajwain (Carom seeds) - 1/2 tsp
  • Turmeric powder - about a pinch for coloring
  • Oil - 1.5 tbsp (for kneading)
  • Salt - as per taste
  • Water- as required (for kneading)
  • Oil/Butter/Ghee - for cooking

Method:
Put all the ingredients into a mixing bowl & knead them together for about 7 minutes. This will be a hard dough. Should not be very soft. When done, cover with a wet cloth for about 20 mts & then roll out the dough log long & divide into equal portions. 
Now, take a portion & place it on the board & use the rolling pin to roll it round just like any other flat bread. while rolling you may want to sprinkle some flour if it sticks to the board.
Heat a heavy skillet or a tava & place the thepla on this. Cook on medium flame or low flame when required as the lauki needs to be cooked well. Use grease on both sides while cooking & press this thepla so it cooks well. When brown spots appear turn & cook the other side.
Theplas are ready!


Note:
  • You may substitute lauki (bottle gourd) with mooli (radish) or methi (fenugreek leaves)
  • I grated the bottle gourd & sprinled salt over it so it releases all the water content. I drained the water before mixing into the flour. Many people do not drain the water off but it might get very sticky so I avoid doing this
  • You may skip greasing the theplas if you want oil free ones
  • Pickles & green chutney are the perfect accompaniment


Thursday, October 11, 2012

Oats Upma - Lunch Box Idea

When it comes to cooking for breakfast or lunch I keep it simple.

With a job which involves a lot of travel across the country I have to treat myself to the food at various restaurants & snack bars & the same goes for my husband so, whenever in town I prefer to cook at home  for my husband & myself.

There is a cafeteria & quite a few eateries within my work campus however, I think no food can match a simple home cooked food. But WHAT!? isn't it?

I spend a lot of time thinking about the food I need to carry. Most times my breakfast as well as lunch are on-the-go. So, I cook easy & keep it easy to carry as well. 

My favorite breakfast items are -  Idlis, Rava Idlis, Vegetable Idlis, Poha, Oats rolls, Stuffed chilla rolls, Veggie stuffed parantha rolls, paneer wraps, Spring rolls etc to name a few.

I carry uncut fruits also as often as possible. Only the melons are cut & the pomegranate de-seeded. I always avoid storing cut Apples, Pears, Bananas, Kiwi fruits, Plum & Oranges. I like to eat them fresh.

Most times I repeat the breakfast item for my lunch as I do not really get much time to cook in the mornings.

So, let us see what I cooked today - OATS UPMA 
This is a great source of fibre & its called the Magic Breakfast in many countries. The wholesome goodness is just so perfect to keep you going through your busy day!


Get some:
  • Oats - I used 2 cups of Quaker Oats 
  • Onions - 2 medium & chopped
  • Tomatoes - 2 medium & chopped
  • Green peas - I used the frozen ones, about half a cup
  • Capsicum - 1 medium & chopped
  • Green Chilies - 3
  • Ginger - half inch, finely chopped 
  • Mustard seed - 1 tsp
  • Urad Dal/white lentils - 1tsp
  • Turmeric Powder - just as required
  • Garam Masala - if required
  • Salt -  as per taste
  • Red chili powder -  as per tolerance
  • Oil - as required

Method:

Take a pan & roast the oats for about 2 minutes on medium flame. Empty into a plate.
Use the same pan, add oil & when it heats up add the mustard seeds. Let it splutter & then put in the lentils. Saute & as soon as it gets golden brown add the onions, green chilies & ginger to this.
Just when the onions get translucent add the tomatoes, capsicum, green peas, turmeric powder, salt, red chili powder & some garam masala. Cover the pan with a lid. Toss when required & if the vegetables are cooked enough add 3 cups of water to boil. Covering with a lid will help the water boil quickly. When the water starts boiling add the oats to this & mix in well. Cover with a lid again for about a minute.
Serve hot!

Note:
  • You may add any vegetable you wish
  • Adding turmeric is also optional
  • You can squeeze in some lemon juice over this to enjoy tangy oats upma
  • I cooked it in Ghee instead of any oil as I used a non stick wok which does not require much grease for cooking

Friday, September 14, 2012

Nostalgic Aviyal

Well, it is true that we all love our mothers & they are the most special ones in all our lives. One of the reasons from the ever-long list is their strong intuition. 
A few days back I was missing my mom, so I decided to call her up & hey she already knew that I was missing her. We chatted for long that day! 
I had also mentioned how much I missed the food she prepares so lovingly!
So, before we ended the call she asked me to prepare some good lunch for myself  -  Aviyal , ghee rice with some papad. :)


After the call, I checked my refrigerator & found raw papaya, some carrots, coconut & green chillies. 
When we talk about Aviyal we are reminded of many veggies which are put together to prepare this dish however, doesn't matter if you have just one or few veggies to cook. I call this a south - Indian mixed vegetable!
Onions & Garlic are avoided in this dish at my home. However, I've heard many use some onion paste in this.

So let's see what I did.

You will need:
  • Raw Papaya - cut like fingers, about 2 inch long
  • Carrots - also cut lengthwise like fingers
  • Coconut - 1/2 cup dessicated
  • Green chillies - as per tolerance, I took 2
  • Ginger - half an inch bit
  • Cumin seeds - 2 tsp
  • Raw rice - 10 grains
  • Curd - 1 cup beaten
  • Curry leave - few (4 to 5)
  • Salt - as per taste

Method:
Take a deep pan & put the papaya & carrots to boil. Add only sufficient water to cook if you want the Aviyal dry or with less gravy. You are free to add more water if you want you Aviyal runny.
Now, grind together the coconut, cumin seeds, green chillies, ginger & raw rice (to thicken Aviyal's consistency). When the vegetables are cooked add the beaten curd, the ground paste & curry leave. Add salt. Cover & cook for another minute or two. Aviyal is ready!

Note:
  • You may add beans, drumsticks, broad beans, snake gourd, raw bananas, potatoes, yam & anything you wish. The more the veggies the tastier & nutritious it becomes
  • Serve with steamed rice, hot phulkas (Indian flat bread) or even dosa. I like it with Dosas 
  • This is always a  part of the feasts served in South India especially Kerala


Sunday, September 2, 2012

Rajma / Red Kidney Beans Curry


Rajma Chawal is my all time favourite!

I was introduced to this only in Delhi after I reached here for my Graduation in the year 2002.
Since then I order for this one wherever possible. And, cook whenever I want a quick delicious meal.
Only trouble being I have to soak them for over 7 hours or pressure cook really long if not soaked.
So, I announce the menu a day before I want to indulge in this & I have never been stopped. Yeah! everyone at home loves it too.

You will need:

  • Rajma - 200gms 
  • Onions - 3 (medium & chopped)
  • Tomatoes - 2 (big) or Puree (I used Puree)
  • Green chillies - as per tolerance (I used 3)
  • Ginger Garlic Paste - 1 tsp
  • Cloves - 4
  • Cinnamon sticks - 2
  • Black Cardamom - 1
  • Ghee/Oil - for frying
  • Salt - as per taste


Let's cook it up:

Soak the Rajma overnight & boil it with some salt & ginger. Check the below pic.
 Keep it aside to add into the curry we prepare.


Heat a wok & add the ghee, cloves, cinnamon sticks & black cardamom. Put the chopped onions & saute till it browns & then pour the tomato puree & ginger garlic paste into this. Check pic below.


Now, its time to add the boiled Rajma into this curry. Add water as per the consistency required. Rajma curry is supposed to be thick so mash some of the Rajma in the curry to gain the thick consistency.
Serve hot!


Note:

  • The best accompaniment of Rajma is plain boiled rice
  • If you wish, u may add some more masalas like red chilli powder, garam masala powder etc
  • Serve with some onion salad or potato fry


Saturday, August 25, 2012

Punjabi Chhole (Chickpeas)

My husband told me yesterday that we have some guests coming over for breakfast today.


I had just started thinking about the menu for the next day morning & my husband expresses his wish to eat some Chhole Puri. Voila! I get an idea & rush to the kitchen to soak the chickpeas to be used the next day.

There are many versions of cooking these chickpeas & this is one of the ways our Punjabi community in India cooks.

It is very tangy & spicy & usually served with Puri. Puri is a wholewheat flat bread, rolled in small circles & deep fried in oil to fluff it up. The dough made is a little harder (not too soft) than the usual dough & some oil is also put into the dough while folding it to make it crispy. Also, the adding of oil ensure that not too much oil is absorbed when frying it.

Though we don't cook this often at home as it consumes a lot of oil but if the temperature of the oil is maintained well & then if the extra oil is well absorbed by the kitchen towels before serving then it is not going to harm you at all.
In fact this is one of the most nutritious breakfast option. It keeps you full & ready for a long busy day.

Even the book by Rujuta Diwekar  of the fame "Women & the weight loss Tamasha" & Kareena Kapoor's dietitian says so.

Chickpeas are high in protein & high in dietary fiber.

The Chhole I made was enjoyed by all the guests & I was all smiles & grateful to my Punjabi friend who taught me this!

So here you go:
  • Chickpeas - about 100 gms
  • Onions - 3 (finely chopped)
  • Whole Spices/Garam Masala - as per taste
  • Whole Coriander Seeds/Dhaniya - 2 tsps
  • Whole Cumin Seeds - 2 tsps
  • Whole Dried Red Chillies - as per tolerance
  • Bay leaves - 2
  • Turmeric Powder 
  • Coriander Powder
  • Red Chilliw Powder
  • Salt - as per taste
  • Oil/Ghee - 1tbsp

Method:

Soak the chickpeas overnight. In the morning boil the chickpeas with some salt & ginger juliennes.

Now, in a wok add the ghee & when its heated add the whole spices & bay leaves. When it crackles add the finely chopped onions. Let it cook till it browns. 

Now add the boiled chickpeas to this & add some turmeric, dhaniya powder, red chilli powder & salt.

Now, to make the special masala:
Roast the Coriander seeds, Cumin seeds & Red chilli powder & grind them together.

Add this powder to the chhole & toss for a while. Add some water as per the consistency you require & cover the wok with a lid.

When about to get done, mash some chhole inside the wok to make the gravy thick.

Punjabi Chhole is ready!


Note:
  • You may add tomatoes or puree if required
  • You may roast the whole spices & grind with the special masala too
  • Serve with Puri/Roti/Parantha
  • Onion salad or some kachumbar will go very well with this


Thursday, August 23, 2012

Steamed Bananas (Nendran Pazham)

Yes! You can bake, steam, fry, grill & even boil your plantains/bananas.

Try them all! But what I am to share with you today makes for a great breakfast or snack.

It is very healthy too. Great carbohydrate source! Well, that is not all my Doctor brother says it is a storehouse of all kinds of essential nutrients like potassium, magnesium & dietary fiber.

Works best for people suffering with gastric ulcers & helps keep a healthy digestive tract. It is also known to prevent cancer.

So why not eat a banana everyday instead??? Might not be possible to eat everyday but what I am trying to say is that eating bananas will not make you fat but healthy.


This is a very South-Indian way of cooking your banana.

All you need is:

  • Some South-Indian plantain which is better called Nendran or Nendran Pazham
  • Water for steaming
  • Steaming Pot


Method:

This is the fastest breakfast I guess!

 The Nendrans you use should be ripened well. The outer skin should change color to brownish black. So this helps you use up the extra ripe bananas so you don't need to dump it thinking its gone bad. Just some black spots are enough actually.

Now pour some water in your steaming pot. I used an Idli cooker. If you don't have one then you could use any cooker & fill water to some 2 inches.When the water starts to boil, place a grill or any other metal container/utensil which would fit in & place the bananas on it. Do not peel the skin off when steaming.

Cover the lid & let it steam for about 8 minutes & tada! your steamed healthy plantains are ready to be served. Cut it lengthwise, into halves or whichever way you wish to & serve with or without some fresh cream or butter. I prefer to eat it without any accompaniment.

Let me know if you try this.

Note:

  • I have not tried it with any other variety of banana - If you do then let me know
  • You could serve this with a dollop of vanilla ice cream


Sunday, June 17, 2012

Kalimirch Paneer (Cottage Cheese in peppery gravy)

Peppery! A strong flavor!
How does it sound to you? Well, to me it sounds delicious.
The goodness of  pepper (good for calorie reduction) in the soft, sweet & creamy gravy just makes me drool.
All we need to do is add the right bit of pepper to get the desired twist for your eagerly waiting taste buds.


We need:

  • Paneer/Cottage Cheese - 200 gms
  • Peppercorns -10-15 (crushed)
  • Onions - 3 medium sized
  • Bay leaves - 2
  • Badi Elaichi (Black Cardamom) - 2
  • Curd - 1 cup
  • Sugar - 1 tsp
  • Salt - As per taste


Method:
Cut the paneer in cubes. Grind the onions & keep ready. Whisk the curd with sugar in it & set aside.
Now, heat the pan, add oil & throw in the bay leaves & badi elaichi. Now, pour the onion paste & saute till it becomes light brown. To this add the crushed peppercorn & curd & let it cook till the oil finds way. Be around to ensure the gravy doesn't stick to the pan. If required add the desired amount of water & wait till it boils. Cover & cook for a few minutes so that the flavors mix in well.
The gravy is ready & the paneer cubes can be now added to this & served hot with your favorite bread!

Not a difficult recipe to follow!
There is no need to add a bowl full of spices to make it tasty.
This finger licking recipe can be cooked within 20 mts.


Note:
  • Do not add turmeric to this dish - you may if you wish to create a remixed version though! :)
  • Sugar is also optional
  • You may add cream instead of curd to make this super rich & fluffy
  • Serve with Indian bread - roti, chappati, parantha


Friday, April 13, 2012

Happy Vishu with Raisin Paal Payasam (Kheer)

HAPPY VISHU, HAPPY BAISAKHI, HAPPY POILA BAISHAKH, TAMIL PUTHANDU VAZHTHIKAL TO ONE & ALL!!! :) :) :)

Friends, today in the midst of work & some more work I didnt really know what to prepare for this auspicious day.
I remember when at home with parents how my father would adorn the puja space of our home with lots of fresh beautiful fruits, vegetables, some oraments, silver coins & many many flowers. My mother would further beautify the space with her special kolams.
Appa would finish the decorations the previous night & my mother would draw the kolams in the morning. They would wake me up early in the morning, very unusual time for me. I would feel my father closing my eyes with his hand & holding me with the other leading me to the puja space. He would then ask me to open my eyes & look straight & heyy thatz me in the mirror reflection.

Yes! this is a tradition followed at my home & how much I miss to be with them today only I know. My heart beats faster thinking of the delicacies prepared today & all I could do today is write this quick post from work just in the middle of a coffee break. hmmmmmph!

Though I dont have much time in hand in the mornings on week days & with my husband travelling I am all the more demotivated to get up & cook, but I managed to prepare this Raisin Paal Payasam.

Sharing the recipe with you! Shall add the pic from home. Pic is now attached! :)


Look for:
  • Milk - 1 ltr. (full cream)
  • Rice - Qtr Cup
  • Semiya/Sevaiyya/Thin vermicelli - Qtr Cup
  • Sugar - As per taste
  • Raisins - 2 tbsp
  • Cardamom Powder - a pinch
  • Rose essence - few drops

Method:
Quickly par boil the rice. I used the microwave & set it on full power (P100) for 7 mts.
Meanwhile, set the milk to boil & after some 10 mts add the sugar & cardamom powder to this along with the par boiled rice. let it cook for another 10 mts & add the vermicelli & raisins to this. Add the rose essence & simmer for 5 more mts & keep stirring. Remove from heat & empty in a serving bowl & garnish with some more raisins. This is a nutritious breakfast too! ;)


Note:
  • If you do not want to mix the rice & vermicelli both then prepare separately in the same method
  • Add some almonds & cashews if you wish  - I didnt want to add almonds as I munch some every day at work
  • You may add some rose petals to this just before removing from heat & let it cool for a while so as to get the taste of the rose petals


Thursday, April 12, 2012

My Quick Cupparoni (Macaroni)

Haha sounds so smilar to the new advt. on TV for the Maggi Souperoni. isnt it? If you didnt watch it yet, no problem! The names only rhyme & both recipes are different with only the macaroni in common.

I came back from work real hungry & this has been happening to me since a week & I end up eating all oily junk. Though Macaroni aint a very healthy option yet is anyday better than what I was stuffing my tummy with. Guess it is prepared with Durum wheat so shouldnt be bad. Right???
This one is real quick & super easy.

Though very similar to the ones you prepare at home I chose to serve it differently.


Get Prepared With:
  • 180 Gms Macaroni - I used the MTR one - boiled
  • Onion - 2 Medium & chopped
  • Tomatoes - 3 Big & chopped
  • Capsicum - 1 Big & chopped
  • Green Chillies - 4 chopped & immersed in vinegar
  • Chilli Flakes - as per tolerance
  • Oregano - as per taste
  • Tomato sauce - as per taste
  • Green chilli sauce - as per tolerance
  • Salt - as per taste
  • Oil for cooking

Method:
Now that the macaroni is boiled, let it remain in the strainer. Take a wok & add oil. Add all the chopped onion & tomatoes, saute till it leaves oil. Add the chopped capsicum & saute only for 30 seconds. Let us add the macaroni, chilli flakes, oregano, salt & toss it for a while so that the macaroni is well coated. When almost ready add both tomato & green chilli sauce. Toss again & throw in the vinegar soaked green chillies.

REMEMBER TO SERVE IN A SOUP BOWL OR A BIGGER CUP & hog on this Cupparoni with CHOPSTICKS!!! :)

Trust me, kids would love this!


Note:
  • It is okay if you do not want to add any sauce to this
  • You may also add some other veggies to this like brocolli, green peas & sprinkle some cheese over this
  • To give the Indian touch to this you may add Indian spices & the same goes any other national

Travel Ideas

Do Not Copy - All the material unless otherwise mentioned are copyright of © Relish Delish... .

MyFreeCopyright.com Registered & Protected